Résumé
Le déploiement correct d'un treuil électrique est une question de physique appliquée, de science des matériaux et de discipline procédurale, représentant un lien de pouvoir et de responsabilité. Une enquête sur son utilisation révèle qu'un fonctionnement sûr et efficace va bien au-delà de la simple activation d'un interrupteur. Elle nécessite une compréhension approfondie des composants mécaniques du treuil, des principes de la dynamique de la charge et des protocoles non négociables du gréement. Cette analyse porte sur le cycle de vie complet d'une opération de treuillage, depuis l'évaluation initiale du site et l'inspection de l'équipement jusqu'à l'exécution de tractions complexes et la maintenance après utilisation. Elle évalue les processus décisionnels critiques impliqués dans la sélection des points d'ancrage, la configuration du gréement avec des accessoires tels que les blocs d'accrochage et les élingues à haute résistance, et la gestion des immenses forces générées. En déconstruisant la procédure en une séquence d'actions délibérées, ce guide cherche à cultiver une compétence profondément ancrée chez l'opérateur. L'objectif est de transformer l'acte de treuillage d'une tâche potentiellement dangereuse en une pratique d'ingénierie contrôlée, reproductible et sûre, applicable dans divers contextes mondiaux, des opérations minières sud-américaines à la récupération hors route au Moyen-Orient.
Principaux enseignements
- Effectuez toujours une inspection complète du treuil, du câble et de tous les éléments du gréement avant utilisation.
- Choisissez un point d'ancrage solide qui peut supporter toute la charge de la traction.
- Utilisez des blocs d'arrachage pour augmenter la puissance de traction et changer la direction de la traction en toute sécurité.
- La maîtrise de l'utilisation d'un treuil électrique implique de maintenir une traction lente, contrôlée et régulière.
- Ne jamais enjamber une ligne de treuil sous tension ; maintenir une distance de sécurité à tout moment.
- Reprendre la ligne de treuil sous une légère tension pour éviter de l'endommager et assurer une bonne mise en place.
- Portez des gants résistants et utilisez une sangle à crochet pour toutes les opérations de manutention de la ligne.
Table des matières
- Comprendre le treuil électrique : Les bases d'une utilisation sûre
- Étape 1 : Inspection rigoureuse avant utilisation et évaluation du site
- Étape 2 : Établir un point d'ancrage sûr
- Étape 3 : Maîtriser l'art du gréement
- Étape 4 : La traction contrôlée : exécution de l'opération
- Étape 5 : Procédures post-opératoires
- Étape 6 : Techniques de treuillage avancées pour les scénarios complexes
- Étape 7 : Maintenance et entretien à long terme
- Le contexte plus large des équipements de levage et de traction
- Foire aux questions (FAQ)
- Une dernière réflexion sur la responsabilité et la maîtrise
- Références
Comprendre le treuil électrique : Les bases d'une utilisation sûre
Avant de savoir comment utiliser un treuil électrique, il faut d'abord se familiariser avec l'outil lui-même. Un treuil électrique n'est pas un objet monolithique, mais un système complexe de pièces en interaction, chacune ayant une fonction spécifique et un point de défaillance particulier. L'utiliser sans ces connaissances de base revient à parler une langue en ne connaissant que quelques phrases ; vous pouvez accomplir une tâche simple, mais vous n'êtes pas préparé à la nuance, à la complexité ou à la crise. La machine est un mélange d'énergie électrique, d'engrenages mécaniques et de résistance des matériaux. Son but est de convertir la rotation à grande vitesse et à couple relativement faible d'un moteur électrique en une traction à grande vitesse et à couple élevé, se manifestant par des milliers de livres de force exercée à travers un câble d'acier ou une corde synthétique. Cette conversion est au cœur de la puissance du treuil, et la compréhension de ce processus est la première étape vers la maîtrise de son application. Nous devons aller au-delà d'une vision superficielle du treuil comme un simple "dispositif de traction" et le considérer comme un système technique exigeant le respect, la connaissance et une manipulation méthodique.
Anatomie d'un treuil électrique : Déconstruction de la machine
Pour commencer notre enquête, disséquons le treuil, en examinant ses éléments constitutifs non pas comme une simple liste à mémoriser, mais comme les organes d'un corps qui fonctionne.
-
Le moteur électrique : C'est le cœur du système. Alimenté par la batterie du véhicule, le moteur génère la force de rotation initiale. Il peut s'agir d'un moteur à enroulement en série, connu pour son couple élevé mais aussi pour sa tendance à générer de la chaleur sous charge, ou d'un moteur à aimant permanent, plus efficace pour une utilisation plus légère et intermittente. Le fait de connaître le type de moteur de votre treuil vous permet de mieux comprendre son cycle d'utilisation, c'est-à-dire le rapport entre le temps pendant lequel il peut fonctionner et le temps dont il a besoin pour refroidir. Ignorer le cycle d'utilisation est une voie courante vers l'épuisement du moteur, une défaillance évitable due à l'impatience.
-
Le train d'engrenages : C'est le muscle du treuil, un système d'engrenages planétaires qui agit comme un multiplicateur de couple. La rotation à grande vitesse et à faible couple du moteur entre dans le train d'engrenages et, par une série de réductions, est transformée en une rotation lente et puissante du tambour du treuil. Le rapport d'engrenage (par exemple, 265:1) indique combien de fois le moteur doit tourner pour faire tourner le tambour une fois. Un rapport plus élevé signifie une plus grande puissance de traction, mais une vitesse de ligne plus lente. Cet avantage mécanique est le principe fondamental qui permet à un petit moteur de déplacer un véhicule de plusieurs tonnes.
-
Le tambour du treuil : Il s'agit de la bobine autour de laquelle le câble du treuil est enroulé. Sa conception est essentielle pour gérer le câble, l'empêcher de s'enrouler et s'assurer qu'il s'enroule uniformément. Le diamètre du tambour influe également sur la puissance de traction du treuil ; la puissance est maximale sur la première couche de câble (la plus proche du tambour) et diminue avec chaque couche suivante au fur et à mesure que le diamètre effectif augmente.
-
La ligne du treuil (corde ou câble) : C'est le nerf de la guerre, l'élément qui transmet la force du treuil à la charge. Le choix entre un câble en acier et un câble synthétique est important et a de profondes implications en termes de sécurité et de manutention, que nous examinerons en détail.
-
Le système de freinage : Il s'agit d'un dispositif de sécurité crucial, souvent négligé. Le frein, généralement un système mécanique automatique, s'enclenche dès que le moteur s'arrête. Sa fonction est de maintenir la charge en toute sécurité, en empêchant le tambour de se dérouler sous l'effet de la tension. Un frein fiable fait la différence entre une pause contrôlée et une défaillance catastrophique.
-
L'embrayage (levier Freespool) : Ce mécanisme désengage le tambour du train d'engrenages, ce qui permet de tirer la ligne à la main (processus appelé "freespooling"). Cette méthode est beaucoup plus efficace que l'utilisation du moteur pour faire sortir la ligne. Comprendre comment engager et désengager l'embrayage en douceur est une compétence opérationnelle de base.
-
Le Fairlead : Il s'agit du guide du câble du treuil, qui l'empêche de frotter contre le pare-chocs ou le support du treuil lorsqu'il est enroulé et déroulé. Il en existe deux types principaux : le chaumard à rouleaux, qui utilise quatre rouleaux pour guider le câble en acier, et le chaumard Hawse, un guide en aluminium lisse et arrondi conçu spécifiquement pour les câbles synthétiques. L'utilisation d'un mauvais type de chaumard détruira rapidement le câble du treuil.
En comprenant cette anatomie, vous commencez à voir le treuil non pas comme une boîte noire, mais comme un système transparent de causes et d'effets. Vous comprenez que la chaleur provient du moteur, que la puissance provient des engrenages et que la sécurité repose sur le frein et l'intégrité de la ligne. Ces connaissances constituent la base sur laquelle reposent toutes les procédures d'exploitation sûres.
La physique de la traction : Comprendre la charge, le frottement et l'avantage mécanique
Le treuillage est un exercice de physique appliquée. Lorsque vous apprenez à utiliser un treuil électrique, vous devenez un physicien pratique, qui manipule les forces pour obtenir le résultat souhaité. La "charge" n'est pas simplement le poids mort de l'objet que vous tirez. La résistance totale que votre treuil doit surmonter est une combinaison de plusieurs facteurs.
- Poids brut du véhicule (PBV) : Il s'agit du point de départ, du poids de base du véhicule ou de l'objet à récupérer.
- Résistance au gradient : Pour tirer un objet vers le haut, il faut vaincre la gravité. Plus l'inclinaison est forte, plus la résistance est importante. Un véhicule de 4 000 livres sur une pente de 45 degrés peut effectivement donner l'impression de peser 2 800 livres de plus au treuil.
- Résistance de la surface (friction) : La nature du sol sur ou dans lequel se trouve la charge crée une immense résistance. Tirer un véhicule dans une boue épaisse et profonde peut facilement doubler ou tripler la force requise par rapport à une traction sur une chaussée plane. Le frottement des pneus enlisés dans le sable, la succion de la boue ou la traînée d'un véhicule centré sur un rocher sont autant de forces puissantes que le treuil doit vaincre.
Une règle empirique consiste à choisir un treuil dont la capacité nominale est au moins égale à 1,5 fois le poids total en charge de votre véhicule. Cela permet de disposer d'une marge de sécurité pour tenir compte de ces facteurs de résistance supplémentaires. Il s'agit toutefois d'un point de départ et non d'une loi définitive. Un véhicule plus lourd dans une situation simple peut nécessiter moins de force de traction qu'un véhicule plus léger dans une situation de blocage profond. C'est là que le jugement de l'opérateur, éclairé par la compréhension de ces principes physiques, devient primordial.
Le concept d'avantage mécanique est également central. Un treuil est un dispositif permettant de créer un avantage mécanique, mais celui-ci peut être encore amplifié grâce au gréement. L'utilisation d'une poulie pour créer une double ligne de traction, une technique que nous aborderons plus tard, en est un parfait exemple. En tirant la ligne du treuil vers un point d'ancrage et en la ramenant vers le véhicule, vous réduisez de moitié la vitesse de la ligne, mais vous doublez presque la puissance de traction de votre treuil. Il ne s'agit pas de magie, mais d'une application directe de la physique, en répartissant la charge sur deux lignes au lieu d'une. Comprendre cela permet à un opérateur disposant d'un treuil de 9 000 livres de déplacer en toute sécurité une charge qui, autrement, dépasserait largement sa capacité.
Câble synthétique ou câble d'acier : Un choix crucial
Le choix du câble de treuil est l'une des décisions les plus importantes que prend un opérateur, avec des conséquences directes sur la sécurité, le poids et la manutention. Aucun des deux n'est universellement supérieur ; le "meilleur" choix dépend de l'application et des priorités de l'utilisateur. Examinons leurs propriétés avec la profondeur qu'elles méritent.
Câble d'acier est le choix traditionnel depuis des décennies. Il est exceptionnellement durable et très résistant à l'abrasion. Si vous effectuez fréquemment des treuillages dans des environnements rocheux et abrasifs, où le câble peut être traîné sur des arêtes vives, l'acier présente un avantage indéniable. Il est également plus résistant à la chaleur, ce qui peut être un facteur lors de tractions longues et lourdes qui font chauffer le tambour du treuil. Cependant, ses inconvénients sont importants. Le câble d'acier est lourd, ce qui le rend difficile à manipuler, en particulier lorsqu'il s'agit de transporter une grande longueur en haut d'une colline escarpée. Il développe des brins tranchants et cassés ("jiggers") qui peuvent facilement déchirer les gants et la peau, ce qui exige une vigilance constante et l'utilisation de gants en cuir épais. Plus grave encore, si un câble d'acier se rompt sous l'effet d'une charge, il emmagasine une énorme quantité d'énergie cinétique. Cette énergie est libérée violemment et le câble rompu est projeté dans l'air à une vitesse incroyable, un phénomène qui peut être mortel, et qui l'a déjà été. C'est pourquoi un amortisseur de ligne (une couverture lourde ou un poids spécialisé) doit toujours être placé sur un câble d'acier lors d'une traction.
Corde synthétiqueL'alternative moderne est le câble de sécurité, généralement fabriqué à partir de matériaux tels que le Dyneema® (une marque de polyéthylène à poids moléculaire ultra-élevé). Son principal avantage est la sécurité. Lorsque la corde synthétique se rompt, elle a très peu de masse et emmagasine beaucoup moins d'énergie cinétique. Elle a tendance à tomber au sol plutôt que de fouetter violemment, ce qui réduit considérablement le risque de blessure catastrophique. Elle est également incroyablement légère - jusqu'à 80% de moins qu'un câble en acier de même résistance - ce qui la rend beaucoup plus facile à transporter et à manipuler. Il flotte sur l'eau, ce qui constitue un avantage considérable pour les traversées d'eau ou les récupérations dans la boue. Cependant, le câble synthétique a ses propres faiblesses. Il est très sensible à l'abrasion et doit être protégé contre les rochers pointus, les coins et même les chaumards Hawse rugueux. Il est également vulnérable aux dommages causés par la chaleur du tambour du treuil et à la dégradation due à l'exposition aux rayons UV et à l'incrustation de gravillons. Il nécessite un entretien plus méticuleux, notamment un lavage régulier pour éliminer les particules de sable et de saleté qui l'endommagent.
| Fonctionnalité | Câble d'acier | Corde synthétique |
|---|---|---|
| Sécurité (en cas de rupture) | Extrêmement dangereux (stocke une grande énergie cinétique) | Beaucoup plus sûr (faible masse, faible libération d'énergie) |
| Poids | Très lourd | Très léger (jusqu'à 80% plus léger) |
| Manipulation | Difficile ; susceptible de se plier et de présenter des bavures tranchantes ("jiggers") | Facile ; flexible, pas de bavures tranchantes, flotte sur l'eau |
| Résistance à l'abrasion | Excellent | Médiocre (nécessite des manchons de protection sur les bords tranchants) |
| Résistance à la chaleur | Bon | Médiocre (peut être endommagé par la chaleur et le frottement du tambour) |
| Maintenance | Nécessite une lubrification ; vérifier qu'il n'y a pas de brins cassés ou de plis. | Nécessite un nettoyage régulier ; vérifier l'absence d'effilochage/d'abrasion |
| Coût | Généralement plus faible | Généralement plus élevé |
| Chapeau requis | Le chaumard à rouleaux | Chaumet de faucon |
En fin de compte, le choix reflète une philosophie d'utilisation. L'acier est le cheval de bataille robuste pour les environnements industriels abrasifs. Le synthétique est le choix moderne pour la récupération des véhicules. Il donne la priorité à la sécurité et à la facilité de manipulation, mais exige de l'opérateur un degré plus élevé d'attention et de vigilance.
Quand choisir un treuil électrique plutôt qu'un palan manuel à chaîne ou à levier ?
Le treuil électrique est un outil spécialisé dans la traction, mais il existe au sein d'une famille plus large d'équipements de manutention. Comprendre la place unique qu'il occupe permet de clarifier son utilisation. Prenons l'exemple du palan manuel à chaîne. Un palan manuel à chaîne, ou bloc de chaîne, est principalement conçu pour le levage vertical. Son système d'engrenage offre un avantage mécanique considérable, permettant à une personne de soulever plusieurs tonnes en tirant sur une chaîne manuelle. Cependant, il est lent et conçu pour un levage vertical contrôlé à partir d'un point fixe en hauteur. Vous utiliseriez un palan manuel à chaîne pour soulever un moteur d'une voiture, et non pour sortir cette voiture d'un fossé. Les principes de capacité de charge sont primordiaux dans les deux cas, car de mauvais calculs peuvent entraîner des défaillances (Zoho Hoist, 2025).
Un palan à levier est similaire, mais il utilise un mécanisme de levier à cliquet au lieu d'une chaîne manuelle. Il est donc plus portable et plus polyvalent pour tirer, tendre et soulever sur de courtes distances. Vous pouvez utiliser un palan à levier pour positionner avec précision un élément lourd ou pour tendre une ligne de clôture. Il offre plus de précision qu'un treuil, mais n'en a pas la vitesse et la longue distance de traction.
Un treuil électrique excelle dans les situations nécessitant une traction longue, puissante et horizontale, souvent sur un terrain difficile. Il se caractérise par sa vitesse (par rapport aux dispositifs manuels) et son fonctionnement à distance, qui permet à l'opérateur de se tenir à une distance de sécurité. Si certains treuils sont conçus pour le levage, la plupart des treuils montés sur des véhicules sont conçus spécifiquement pour la traction. L'utilisation d'un treuil de récupération de véhicule standard pour un levage aérien vertical constitue souvent une violation de ses paramètres de conception et un risque sérieux pour la sécurité. Pour un véritable levage vertical, un palan électrique à chaîne est l'outil approprié, car il intègre des systèmes de freinage et des charges nominales spécifiques à cet effet (Weihua, 2025). La sélection correcte de l'équipement est un principe de sécurité fondamental (Jindiao Lifting, 2025). Par conséquent, la première étape pour savoir comment utiliser un treuil électrique est de savoir quand l'utiliser et quand un autre outil, comme un palan manuel à chaîne ou un palan à levier, est le choix le plus approprié.
Étape 1 : Inspection rigoureuse avant utilisation et évaluation du site
Les moments les plus critiques d'une opération de treuillage se produisent souvent avant même que le treuil ne soit mis en marche. Une culture de la diligence préventive, de l'inspection méthodique et de l'évaluation réfléchie est la meilleure défense contre les accidents et les défaillances de l'équipement. Se précipiter à ce stade, c'est jouer avec des forces que l'on ne respecte pas entièrement. L'opérateur professionnel aborde la scène non pas avec l'empressement de tirer, mais avec l'œil prudent d'un détective, recueillant les indices de l'équipement et de l'environnement pour se faire une idée complète de la tâche qui l'attend. Cet état d'esprit est essentiel à l'utilisation responsable d'outils puissants.
La ronde quotidienne : Un rituel de sécurité non négociable
Avant chaque utilisation, le treuil et l'ensemble du gréement associé doivent être inspectés. Il ne s'agit pas d'un simple coup d'œil, mais d'un examen systématique et tactile. Il s'agit d'une conversation avec votre équipement, au cours de laquelle vous recherchez des signes de tension, d'usure et de détérioration.
- Le treuil lui-même : Commencez par le support du treuil. Est-il bien fixé ? Vérifiez les boulons qui le fixent au châssis ou au pare-chocs du véhicule. Un support mal fixé peut transformer l'ensemble du treuil en projectile. Vérifiez que le boîtier du treuil ou la plaque de montage ne présentent pas de fissures. Inspectez les câbles électriques qui partent de la batterie. Les connexions sont-elles bien serrées et exemptes de corrosion ? L'isolation est-elle intacte, sans frottement ni fils dénudés ? Une mauvaise connexion électrique peut non seulement empêcher le treuil de fonctionner, mais aussi créer un risque d'incendie.
- La ligne de treuil : C'est peut-être la partie la plus critique de l'inspection.
- Pour les câbles en acier : En portant des gants de cuir épais, déroulez une partie importante du câble. Passez votre main gantée le long du câble, à la recherche de brins cassés ("jiggers"). Quelques brins cassés sont acceptables pendant la durée de vie d'un câble, mais des groupes de brins cassés à un endroit donné indiquent un point faible susceptible de céder sous l'effet de la charge. Recherchez tout signe de pliage, d'écrasement ou de corrosion importante. Un pli est un point faible structurel permanent qui réduit considérablement la résistance à la rupture du câble.
- Pour les cordes synthétiques : Inspectez visuellement toute la longueur de travail pour détecter des signes d'abrasion, d'effilochage ou de "glassing" (où la friction a fait fondre les fibres, créant une surface dure et brillante). Accordez une attention particulière aux premiers mètres près du crochet, car c'est souvent là que l'usure est la plus importante. Palpez le cordage pour détecter la présence de particules incrustées, comme du sable ou des gravillons, qui agissent comme du papier de verre interne, coupant les fibres de l'intérieur. Si la corde est sale, elle doit être nettoyée avant d'être utilisée. Toute coupure ou abrasion importante affectant plus d'un quart du diamètre de la corde doit être remplacée.
- L'hameçon : Examinez le crochet. Le verrou de sécurité fonctionne-t-il correctement, en se remettant en place ? Le crochet est-il déformé de quelque manière que ce soit ? Un crochet "ouvert" ou déformé est un signe de surcharge et doit être remplacé immédiatement.
- Le matériel de gréement : Chaque pièce de l'équipement qui fera partie de la traction doit être inspectée. Vérifiez que les manilles (anneaux en D) ne présentent aucun signe de déformation ou de fissure. Assurez-vous que la goupille s'enfile en douceur et s'insère complètement. Inspectez votre protecteur de tronc d'arbre et toute élingue à haute résistance pour vérifier qu'il n'y a pas de coupures, de déchirures ou de coutures endommagées. Si vous prévoyez d'utiliser une poulie, assurez-vous que le réa (la roue) tourne librement et qu'il n'y a pas de fissures dans les plaques latérales.
Ce rituel doit être tellement ancré qu'il en devient automatique. C'est la première et la meilleure occasion pour l'opérateur de prévenir un accident avant même que les forces ne soient appliquées.
Évaluer l'environnement : Conditions du sol, obstacles et points d'ancrage
Une fois l'équipement vérifié, vous devez maintenant tourner votre regard analytique vers l'environnement. La situation dicte la stratégie. Quelle histoire la scène vous raconte-t-elle ?
- Analyser le "blocage" : Comment le véhicule est-il immobilisé ? Est-il enlisé dans la boue, le sable ou la neige ? Est-il centré sur un rocher ou un tronc d'arbre ? Est-il sur une pente abrupte ? La nature de l'enlisement détermine la direction et l'intensité de la force nécessaire. Un véhicule embourbé dans une boue profonde est retenu par d'énormes forces de succion, ce qui nécessite une traction puissante et régulière. Un véhicule sur une pente peut nécessiter une traction à la fois vers le haut et vers l'avant.
- Sonder la zone de traction : Examinez l'ensemble de la zone située entre votre véhicule de treuillage et le véhicule à récupérer. Quels sont les obstacles qui se trouvent sur le chemin ? Y a-t-il des rochers, des arbres ou des fossés que le véhicule récupéré devra franchir une fois qu'il aura commencé à se déplacer ? Votre traction doit non seulement libérer le véhicule, mais aussi le guider vers un endroit sûr et stable.
- Identifier les points d'ancrage potentiels : Examinez votre environnement à la recherche de points d'ancrage viables. Un arbre sain et solide est souvent la meilleure option. Un gros rocher peut également faire l'affaire, à condition qu'il soit bien enfoncé dans le sol. Un autre véhicule lourd peut servir d'ancre. Ce que vous recherchez, c'est quelque chose d'incontestablement plus solide que la force générée par votre treuil. Un petit arbre, une souche morte ou un rocher décoratif ne sont pas des points d'ancrage, mais des projectiles potentiels.
- Établir des zones de sécurité : Délimitez mentalement (ou physiquement) la zone de danger. La principale zone de danger est une zone située sur les côtés de la ligne de treuil, formant un cône entre le treuil et l'ancre. Ne vous tenez jamais à l'intérieur de cette zone. Si la ligne se rompt, elle se cassera probablement sur le côté. Vous devez également établir une zone "interdite" directement sous la ligne tendue. Personne ne doit jamais enjamber ou se tenir à proximité d'une ligne de treuil sous tension. Les zones de sécurité se trouvent loin sur les côtés ou à l'intérieur d'un véhicule. Avant le début de la traction, toutes les personnes qui ne sont pas directement impliquées dans l'opération doivent être placées en lieu sûr. Il s'agit là d'une règle non négociable concernant l'utilisation d'un treuil électrique.
Calculer la charge : au-delà de l'évidence
Comme nous l'avons vu dans la section consacrée à la physique, le calcul de la charge réelle est un art qui s'appuie sur la science. Vous avez le poids de base de votre véhicule (PTAC). Vous devez maintenant ajouter la résistance estimée de l'environnement.
| Facteur de résistance | Description | Estimation de la charge ajoutée (multiplicateur du PTAC) |
|---|---|---|
| Niveau, Surface dure | Résistance au roulement sur la chaussée ou la terre battue. | 1,0x (PTAC de base) |
| Boue peu profonde/sable/neige | Les pneus sont partiellement embourbés. | 1,5x - 2,0x |
| Boue profonde/sable/neige | Les pneus sont enfouis dans les essieux ; l'aspiration est un facteur. | 2,0x - 3,0x |
| Inclinaison modérée (15-30°) | Force supplémentaire nécessaire pour vaincre la gravité. | Ajouter 25-50% de PTAC au total. |
| Forte inclinaison (30-45°) | Résistance gravitationnelle importante. | Ajouter 50-70% de PTAC au total. |
Exemple de calcul : Imaginez un véhicule de 2 270 kg coincé dans une boue profonde sur une légère pente de 15 degrés.
- Poids de base : 5 000 lbs
- Résistance à la boue : Soyons prudents et estimons un multiplicateur de 2 pour la boue profonde. 5 000 livres * 2 = 10 000 livres de force.
- Résistance à l'inclinaison : Une pente de 15 degrés ajoute environ 25% au PTAC. 0,25 * 5 000 lbs = 1 250 lbs.
- Charge totale estimée : 10 000 lbs + 1 250 lbs = 11 250 lbs.
Votre treuil et votre gréement doivent être conçus pour supporter cette charge de 11 250 livres. Si vous avez un treuil de 9 500 livres, vous dépassez déjà sa capacité. C'est un signal clair que vous devez utiliser une poulie d'arrêt pour créer une double ligne de traction, qui doublera presque la capacité effective de votre treuil à environ 19 000 livres, ramenant l'opération dans une marge de sécurité. Ce calcul immédiat est la marque d'un opérateur compétent qui comprend comment utiliser un treuil électrique non seulement comme un outil, mais aussi comme un système d'ingénierie.
Étape 2 : Établir un point d'ancrage sûr
Le point d'ancrage est la base de toute l'opération de treuillage. Toute la force générée par votre treuil, transmise par la ligne, sera supportée par ce seul point. Si l'ancre cède, c'est tout le système qui cède. La défaillance d'un point d'ancrage est l'un des événements les plus dangereux dans le domaine du treuillage, car elle peut entraîner la projection dans les airs d'un câble tendu et d'une pièce de gréement lourde (comme une manille ou même l'ancre elle-même). La sélection et la préparation d'un point d'ancrage exigent donc un jugement sobre et prudent.
La hiérarchie des ancres : Du naturel à l'artificiel
Tous les ancrages ne sont pas égaux. Un opérateur expérimenté évalue les ancres potentielles sur la base d'une hiérarchie claire de fiabilité.
- L'arbre substantiel et vivant : Il est souvent considéré comme l'étalon-or des ancrages naturels. Qu'est-ce qui fait qu'un arbre est "substantiel" ? Il doit avoir un diamètre d'au moins 30 cm et être profondément enraciné. Il doit être vivant et en bonne santé. Un arbre mort, quelle que soit sa taille, peut avoir un cœur ou un système racinaire pourri et peut se briser ou être déraciné sous l'effet de la charge. Lorsque vous choisissez un arbre, inspectez sa base et le sol qui l'entoure. Le sol est-il ferme ? Un grand arbre planté dans un sol mou et gorgé d'eau peut ne pas être aussi solide qu'un arbre plus petit planté dans un sol solide et rocailleux.
- Le grand Boulder intégré : Un rocher massif peut constituer un excellent point d'ancrage, mais seulement s'il fait vraiment partie du paysage. Un rocher simplement posé à la surface, quelle que soit sa taille, peut être roulé ou déplacé par les forces immenses d'un treuil. Vous recherchez un rocher au moins partiellement enfoui, en place depuis des siècles. Le gréement doit être placé bas sur le rocher afin de tirer contre sa base la plus stable, minimisant ainsi le risque de basculement.
- Points d'ancrage dédiés et conçus : Dans certains parcs industriels ou tout-terrain, vous pouvez trouver des ancrages au sol spécialement conçus à cet effet. Il s'agit de structures en acier cimentées ou enfoncées profondément dans le sol, spécialement conçues pour supporter des charges élevées. S'ils sont disponibles, ces ancrages constituent un choix excellent et fiable.
- Un autre véhicule : Un autre véhicule peut constituer un point d'ancrage très efficace, mais cela nécessite un protocole spécifique. Le véhicule d'ancrage doit être d'un poids similaire ou supérieur à celui du véhicule à récupérer. Il doit être positionné de manière à faire face à la récupération, avec ses freins serrés, en position de stationnement (pour les véhicules automatiques) ou en position de vitesse (pour les véhicules manuels), et avec ses roues calées. La ligne du treuil doit être attachée à un point de récupération nominal sur le châssis du véhicule d'ancrage, jamais à une boule de remorquage, à un essieu ou à un élément de la suspension.
- L'ancre de terre / l'ancre de l'homme mort (dernier recours) : Dans les situations où il n'y a pas d'ancrage naturel ou de véhicule (comme dans un désert ou un champ ouvert), vous devez en créer un. Cela peut se faire à l'aide d'un dispositif spécialisé appelé ancrage au sol (qui ressemble à une petite charrue qui s'enfonce dans le sol) ou en créant un ancrage "homme mort". Il s'agit d'enterrer une roue de secours ou un gros rondin à l'horizontale dans une tranchée perpendiculaire à la direction de la traction, et d'y attacher la ligne du treuil. Il s'agit d'une technique avancée qui demande beaucoup de travail et qui est réservée aux cas où il n'y a pas d'autres options.
Le principe de base est de toujours choisir l'ancre la plus conservatrice et la plus solide disponible. Si vous avez le moindre doute sur l'intégrité d'une ancre, ne l'utilisez pas. Trouvez-en une meilleure, même si cela signifie que vous devez utiliser plus de ligne ou monter une traction plus complexe.
L'art du protecteur de tronc d'arbre : Préserver la nature et le matériel
Lorsqu'on utilise un arbre comme point d'ancrage, il est absolument nécessaire d'utiliser une sangle de protection du tronc. Il s'agit d'une sangle large et indéformable en polyester résistant. Il ne faut jamais enrouler un câble ou une chaîne de treuil directement autour d'un arbre.
Il y a deux raisons principales à cela, l'une écologique et l'autre pratique. D'un point de vue écologique, le fait d'enrouler un câble d'acier autour d'un arbre et de le soumettre à des milliers de livres de force va ceinturer l'arbre, couper l'écorce et la couche de cambium qui se trouve en dessous. La couche de cambium est la partie vivante de l'arbre qui transporte les nutriments. Si elle est endommagée, l'arbre mourra. En tant qu'utilisateurs responsables de la nature, nous avons l'obligation éthique de ne pas laisser de traces et de préserver l'environnement dont nous jouissons. L'utilisation d'un protecteur de tronc d'arbre répartit la force sur une large zone, évitant ainsi ces dommages.
En pratique, l'enroulement d'un câble autour de lui-même pour l'ancrer à un arbre est extrêmement dommageable pour le câble. La pression peut écraser le câble et l'angle aigu peut créer un point faible. Plus important encore, il s'agit d'une connexion peu sûre. Le câble peut glisser et le crochet, lorsqu'il est rattaché au câble, peut créer une charge ponctuelle dangereuse qui affaiblit considérablement le câble.
La procédure à suivre est simple :
- Enroulez la sangle de protection du tronc autour de la base de l'arbre d'ancrage. La base est la partie la plus solide.
- Passez une extrémité de la sangle dans la boucle de l'autre extrémité, en la serrant contre l'arbre.
- Attachez une manille à anneau en D dans les deux boucles situées aux extrémités de la sangle. Veillez à faire passer la goupille de la manille dans les deux boucles.
- Serrez l'axe de la manille jusqu'à ce qu'il soit bien ajusté, puis revenez en arrière d'environ un quart de tour. Cela permet d'éviter que la goupille ne se bloque sous l'effet de la charge, ce qui la rendrait impossible à retirer par la suite.
- Cette manille devient alors le point d'attache sûr et nominal de votre crochet de treuil.
Cette procédure simple, d'une durée de cinq secondes, protège l'arbre et votre équipement, et crée une connexion beaucoup plus sûre. Il s'agit d'une étape non négociable dans la pratique professionnelle du treuillage.
Utilisation d'un autre véhicule comme point d'ancrage : Protocoles et précautions
L'utilisation d'un second véhicule comme point d'ancrage est courante et efficace, mais elle introduit une deuxième série de variables qui doivent être gérées. La personne qui conduit le véhicule d'ancrage devient un participant actif de la récupération.
Positionnement du véhicule d'ancrage : La position idéale est directement dans l'axe du véhicule à récupérer. Cela crée une traction droite, qui est la configuration la plus efficace et la plus sûre. Le véhicule d'ancrage doit, si possible, se trouver sur un terrain stable et plat.
Fixation du véhicule d'ancrage :
- Mettez le moteur en marche. Cela permet de s'assurer que la batterie est chargée et que la direction assistée et les freins sont actifs si nécessaire.
- Serrer fermement le frein à main.
- Placez la boîte de vitesses en position de stationnement (pour une boîte automatique) ou sur un petit rapport (pour une boîte manuelle).
- Pour plus de sécurité, calez les roues du côté de la descente.
- Le conducteur doit rester dans le véhicule, le pied légèrement appuyé sur la pédale de frein. Il ne doit pas être en train de conduire ou de faire marche arrière, car cela peut créer des chocs. Son rôle est d'être un point d'ancrage statique.
Le point de connexion : C'est un point où les erreurs sont fréquentes et dangereuses. Vous ne devez attacher la ligne du treuil qu'à un point de récupération nominal sur le véhicule d'ancrage. Il s'agit de boucles ou de crochets robustes boulonnés ou soudés directement au châssis du véhicule. Ils sont spécialement conçus pour résister aux forces d'une récupération.
Vous devez JAMAIS d'y attacher une ligne de treuil :
- Une boule de remorquage : Les boules d'attelage sont conçues pour la simple charge de remorquage, et non pour l'immense charge de traction d'une récupération par treuillage. Elles peuvent se rompre au niveau de la tige et se transformer en un boulet de canon mortel, ce qui est d'ailleurs le cas.
- L'essieu ou les composants de la suspension : Ces pièces ne sont pas conçues pour supporter les forces de traction d'un treuil et peuvent être pliées ou cassées, ce qui entraîne une réparation coûteuse et un échec de la récupération.
- Le pare-chocs (sauf s'il est équipé de points de récupération intégrés et montés sur le cadre) : La plupart des pare-chocs d'usine sont cosmétiques et doivent être retirés du véhicule.
L'utilisation d'un véhicule comme point d'ancrage nécessite une communication claire et une compréhension commune de la procédure par les deux conducteurs. Cela transforme une opération en solo en un travail d'équipe, où les actions de chaque personne affectent la sécurité de l'autre. Il s'agit d'une leçon essentielle sur l'utilisation d'un treuil électrique dans le cadre d'un système.
Étape 3 : Maîtriser l'art du gréement
Le gréement est le langage du treuil. Il s'agit de l'art et de la science qui consistent à relier le treuil à la charge à l'aide d'un système de cordes, de sangles et de matériel afin de transmettre la force de manière sûre et efficace. Une mauvaise configuration du gréement peut annuler la puissance du treuil le plus puissant, tandis qu'une configuration intelligente peut amplifier les capacités d'un treuil plus petit. C'est là que les connaissances et la créativité de l'opérateur prennent tout leur sens. Il ne suffit pas d'accrocher et de tirer, il faut aussi comprendre les outils du gréement et la façon dont ils interagissent avec les forces en jeu.
Le rôle des manilles, des blocs d'arrêt et des élingues à haute résistance
Votre kit de dépannage ne doit pas se limiter au treuil lui-même. Il est essentiel de disposer d'un ensemble d'équipements de gréement de haute qualité. Il ne s'agit pas d'accessoires, mais de composants fondamentaux du système de treuillage.
- Manilles (anneaux en D ou manilles de proue) : Ce sont les connecteurs universels de toute installation de gréement. Ils sont utilisés pour connecter votre crochet de treuil à un protecteur de tronc d'arbre, à une sangle de récupération ou au point de récupération d'un véhicule. Utilisez toujours une manille dont la charge nominale est nettement supérieure à la capacité de votre treuil. Lors de la connexion, le crochet du treuil doit passer à travers le corps de la manille (l'"arc") et la goupille de la manille doit être attachée à la sangle ou au point de récupération. Ne jamais "charger latéralement" une manille ; la force doit toujours être appliquée en ligne droite le long de l'axe prévu. Comme indiqué précédemment, serrez la goupille à fond, puis revenez en arrière d'un quart de tour pour éviter qu'elle ne se bloque sous l'effet de la charge.
- Blocs d'arrachage : Une poulie d'arrêt est une poulie robuste dotée d'une plaque latérale qui peut être ouverte, ce qui permet d'insérer une boucle de la ligne du treuil sans avoir à enfiler toute la ligne à travers la poulie. Son rôle est double et transformateur. Premièrement, elle peut être utilisée pour presque doubler la puissance de traction de votre treuil (comme nous le verrons dans la section sur les techniques avancées). Deuxièmement, il peut être utilisé pour rediriger la traction. Si votre véhicule n'est pas en ligne droite avec un bon point d'ancrage, vous pouvez utiliser une poulie attachée à un point d'ancrage pour changer la direction de la ligne, ce qui vous permet de tirer en ligne droite même si le point d'ancrage se trouve sur le côté. La poulie est sans doute l'outil le plus puissant de votre kit de gréement, car elle permet de transformer des problèmes complexes en solutions géométriques simples.
- Élingues et sangles de récupération à haute résistance : Elles se distinguent des simples sangles de remorquage. Une sangle de récupération (ou "sangle d'arrachage") est conçue pour s'étirer et emmagasiner de l'énergie cinétique afin d'aider à "arracher" un véhicule légèrement coincé. Ces sangles doivent pas ne doit pas être utilisé dans le cadre d'un treuillage statique, car l'étirement peut créer des mouvements imprévisibles et dangereux. Pour le treuillage, il faut élingues à haute résistance ou des sangles non extensibles, comme un protecteur de tronc d'arbre ou une sangle d'extension de gréement. Celles-ci fournissent une connexion prévisible et statique pour l'extension de votre ligne de treuil ou pour la création de configurations de gréement complexes. L'utilisation du bon type de sangle est un détail crucial qui distingue un opérateur compétent.
La ligne d'embobinage : Techniques de prévention de la nidification des oiseaux
Une fois votre point d'ancrage établi et votre plan de gréement en tête, il est temps d'amener la ligne du treuil jusqu'à l'ancre. Pour ce faire, il faut mettre le treuil en position "freespool".
- Débrayer : Localisez le levier d'embrayage de votre treuil. Il comporte généralement des positions "Engagé" et "Désengagé" (ou "Freespool"). Placez le levier en position débrayée. Cela permet de déconnecter le tambour du moteur et du train d'engrenages.
- Utilisez la sangle à crochet : Votre treuil devrait être équipé d'une petite sangle attachée au crochet. Utilisez cette sangle pour tirer la ligne. Ne mettez jamais vos doigts à l'intérieur du crochet. Si la ligne se rétracte inopinément, vous risquez de vous blesser gravement.
- Marcher sur la ligne jusqu'à l'ancre : Tirez la ligne en la dirigeant vers le point d'ancrage que vous avez préparé. Maintenez une légère tension sur la ligne pendant que vous la tirez pour éviter qu'elle ne s'emmêle sur le sol.
- Évitez les "nids d'oiseaux" : Si vous tirez la ligne trop rapidement sans aucune résistance, les enroulements sur le tambour risquent de se gonfler et de s'emmêler, créant ainsi un "nid d'oiseau". La ligne peut alors se bloquer et s'abîmer lorsque vous commencez à tirer. La meilleure pratique consiste à demander à une deuxième personne de tenir la ligne, en exerçant une légère traction pendant que vous la sortez, afin qu'elle se détache du tambour en douceur.
Ne tirez que la quantité de ligne dont vous avez besoin pour atteindre l'ancre et mettre en place votre gréement. Plus la longueur de ligne est importante, plus elle peut s'étirer (même l'acier s'étire légèrement) et plus elle risque de rencontrer un obstacle invisible ou un point d'abrasion.
La bonne façon de fixer le crochet
La connexion finale se fait au niveau de la manille de votre sangle d'ancre.
- Retirez la goupille de votre manille à anneau en D.
- Placez le crochet du treuil sur le corps de la manille.
- Réinsérez la goupille de la manille dans les boucles de votre protecteur de tronc d'arbre (ou d'une autre sangle).
- Serrez la goupille jusqu'à ce qu'elle s'emboîte, puis revenez en arrière d'un quart de tour.
Votre séquence de connexion doit être la suivante : Véhicule -> Treuil -> Ligne de treuil -> Crochet -> Manille -> Protecteur de tronc d'arbre -> Arbre d'ancrage.
À ce stade, revenez vers le treuil et réengagez l'embrayage. Vous devriez entendre ou sentir un "clunk" solide lorsque le train d'engrenages se reconnecte avec le tambour. Tirez doucement sur la ligne pour vous assurer que l'embrayage est bien enclenché. La ligne ne doit pas se détacher. Vous pouvez maintenant utiliser la télécommande pour rattraper lentement le mou de la ligne jusqu'à ce qu'elle soit tendue. Le système est maintenant prêt pour la traction.
Comprendre les angles de ligne et la puissance du bloc d'arraché
La géométrie de votre traction a un impact profond sur les forces en jeu. Une traction droite et directe est toujours la plus efficace. Cependant, le monde réel offre rarement des scénarios aussi parfaits. C'est là qu'une connaissance approfondie de l'utilisation d'une poulie d'arraché devient la marque d'une véritable expertise.
Imaginez que vous êtes coincé dans une fosse de boue et que le seul arbre d'ancrage solide se trouve à 90 degrés de votre côté. Si vous tirez directement vers cet arbre, vous tirerez votre véhicule sur le côté, ce qui risque d'aggraver la situation, voire de le faire basculer. Vous devez tirer vers l'avant.
Il s'agit d'un scénario classique pour une traction redirigée à l'aide d'un bloc d'arraché.
- Faites passer votre ligne de treuil jusqu'à l'arbre d'ancrage de votre côté.
- Fixez la cale d'arrêt à l'arbre à l'aide d'un protecteur de tronc et d'une manille.
- Faites passer le câble du treuil dans la poulie de la cale d'arrêt.
- Faites passer l'extrémité de la ligne vers l'avant, jusqu'à un deuxième point d'ancrage plus léger situé directement devant votre véhicule (il peut s'agir d'un petit arbre, d'une roue de secours enterrée ou même simplement d'un piquet planté dans le sol, qui supportera une force beaucoup moins importante).
- Attachez le crochet du treuil à ce deuxième point d'ancrage.
Lorsque vous utilisez le treuil, le bloc d'arrêt de l'ancrage latéral agit comme un pivot. La force du treuil tire la ligne vers le bloc, ce qui se traduit par une traction vers l'avant de votre véhicule. Vous avez réussi à changer la direction de la force. Bien qu'il s'agisse d'une technique avancée, il est fondamental d'en comprendre le principe. Elle montre que le gréage n'est pas seulement une question de connexion, mais aussi de manipulation intelligente des vecteurs de force. C'est l'essence même de la maîtrise de l'utilisation d'un treuil électrique dans des conditions complexes et réelles.
Étape 4 : La traction contrôlée : exécution de l'opération
C'est le moment de l'action, où l'énergie potentielle se transforme en énergie cinétique et où le travail de récupération commence. C'est aussi le moment où le risque est le plus élevé. Les forces en présence sont immenses et la situation est dynamique. Le contrôle, la communication et l'observation constante sont les principes directeurs. L'objectif n'est pas la vitesse, mais le progrès. Une traction lente, régulière et délibérée est infiniment plus sûre et plus efficace qu'une traction rapide et saccadée.
La communication est essentielle : Établir des signaux clairs
Si vous travaillez en équipe, même à deux, une communication claire, simple et préétablie n'est pas seulement utile ; il s'agit d'un protocole de sécurité essentiel. Avant de tendre la ligne, toutes les personnes concernées doivent se mettre d'accord sur un ensemble de signaux manuels. Il n'est pas fiable de crier au-dessus du bruit d'un moteur et d'un treuil qui s'essouffle.
Un ensemble standard de signaux pourrait comprendre
- Treuil en place (traction) : Pouce levé, signalant "tirer dans la ligne".
- Arrêter : Une main plate et ouverte levée, comme un agent de la circulation. Ce signal signifie "arrêtez tout immédiatement".
- Se détendre : Pouce vers le bas, signalant "payer une petite ligne".
La personne qui a la meilleure vue sur l'ensemble de l'opération - souvent quelqu'un qui se tient sur le côté, loin de la ligne - doit être désignée comme "observateur". L'opérateur du treuil se concentre sur la télécommande et le treuil lui-même, mais n'agit qu'en fonction des signaux émis par le guetteur. Le conducteur du véhicule récupéré a son propre rôle : il doit être prêt à appliquer doucement la puissance ou la direction uniquement lorsque l'observateur lui en donne l'ordre. Cette chaîne de commandement permet d'éviter toute confusion et de s'assurer que tout le monde travaille ensemble.
Gérer la télécommande : La finesse plutôt que la force
La télécommande du treuil, qu'elle soit câblée ou sans fil, est votre interface directe avec des milliers de livres de force. Elle doit être manipulée avec finesse.
- Dégager la zone : Avant de commencer la traction, effectuez un dernier balayage visuel. Confirmez que toutes les personnes, tous les animaux de compagnie et tous les équipements inutiles ont été éloignés de la zone de traction. Annoncez à voix haute : "Treuillage ! Écartez-vous !"
- Amortir la ligne : Placez un amortisseur de ligne sur la ligne du treuil, à peu près à son point médian. Une couverture épaisse, un amortisseur en vinyle conçu à cet effet ou même une veste épaisse feront l'affaire. Le but de l'amortisseur est d'absorber et de rediriger l'énergie de la ligne en cas de rupture. Un câble d'acier qui se rompt verra son mouvement de fouet arrêté par l'amortisseur, ce qui le fera tomber au sol. Bien que cela soit moins important pour les câbles synthétiques, il s'agit toujours d'une bonne pratique car cela peut aider à contrôler une ligne qui se rompt et sert d'avertissement très visible que la ligne est sous tension.
- Commencez à tirer : Commencez par de brèves impulsions contrôlées. Treuiller pendant quelques secondes, puis faire une pause. Écoutez le moteur du treuil. Est-il trop sollicité ? Surveillez le point d'ancrage. Y a-t-il des signes de déplacement ou de détresse ? Observez la ligne elle-même. S'enroule-t-elle uniformément sur le tambour ? Ces premiers tirages courts permettent à l'ensemble du système de se stabiliser sous la charge et vous donnent l'occasion de repérer les problèmes avant qu'ils ne deviennent critiques.
- Maintenir un rythme régulier : Une fois que vous êtes sûr que le système est sécurisé, vous pouvez commencer à tirer de manière plus soutenue et régulière. Le rythme idéal est lent. Le véhicule récupéré doit se déplacer à un rythme de marche lent. Cela minimise les chocs subis par l'équipement et donne au conducteur du véhicule récupéré le temps de se diriger.
- Aider avec les roues : Le conducteur du véhicule bloqué doit être au volant, prêt à aider. Une fois que le véhicule commence à se déplacer sous l'effet du treuil, l'observateur peut indiquer au conducteur d'accélérer légèrement dans le sens de la marche. Les roues doivent tourner à la même vitesse que le véhicule est tiré. Faire tourner les roues à toute vitesse ne fera qu'enfoncer le véhicule plus profondément et peut le faire basculer vers l'avant, créant une charge de choc dangereuse sur le câble du treuil. Le treuil doit faire la plus grande partie du travail ; le moteur du véhicule est là pour aider, pas pour prendre le relais.
La mise en commun sous tension : Le secret d'un tambour de treuil sain
La façon dont la ligne retourne sur le tambour est d'une importance capitale pour la santé de votre ligne de treuil et la performance de votre prochaine traction. Ne rembobinez jamais une ligne sur le tambour sans tension. Si vous le faites, les enroulements extérieurs seront lâches et pourront être tirés vers le bas entre les enroulements inférieurs lorsque vous le mettrez en charge plus tard. Ce phénomène, appelé "plongée" ou "écrasement", peut gravement endommager, voire sectionner une ligne de treuil, qu'elle soit en acier ou synthétique.
La bonne technique consiste à rembobiner la ligne sous une charge légère et régulière. Cela permet de s'assurer que les enroulements sont bien serrés et réguliers les uns à côté des autres. Après une récupération, si vous disposez d'une longue étendue de terrain dégagé et plat, vous pouvez y parvenir en accrochant la ligne à un autre véhicule ou à un point fixe et en utilisant le treuil pour tirer votre propre véhicule vers l'avant, en laissant la traînée de votre véhicule fournir la tension nécessaire.
Si vous êtes sur le terrain et que vous devez remballer, vous pouvez demander à un partenaire d'assurer la tension en tenant la ligne (avec des gants !) et en la ramenant vers le treuil pendant que vous l'actionnez. Le partenaire doit se tenir bien à l'écart et se contenter d'assurer la traction, sans essayer de retenir toute la force de la ligne. L'objectif est d'obtenir une tension d'environ 500 livres, ce qui est suffisant pour obtenir un enroulement serré et net. Un tambour correctement enroulé est le signe d'un professionnel qui comprend les subtilités de l'utilisation d'un treuil électrique.
Surveillance du système : Surveiller les signes de tension
Pendant toute la durée de la traction, l'opérateur et le guetteur doivent être vigilants et utiliser leurs sens pour surveiller la santé du système.
- Écouter : Quel est le bruit du moteur du treuil ? Un moteur sain, soumis à une charge lourde mais gérable, émet un bourdonnement grave et régulier. Un sifflement aigu ou un changement de tonalité peut indiquer que le moteur est surchargé ou que la batterie est défaillante. Des cliquetis ou des bruits de grincement provenant du corps du treuil peuvent indiquer un problème au niveau du train d'engrenages.
- Regarder : Gardez les yeux en mouvement. Balayez du regard le point d'ancrage, le long de la ligne, jusqu'au chaumard et au tambour. L'ancre se déplace-t-elle ? L'arbre se plie-t-il de manière inquiétante ? La ligne vibre-t-elle ou oscille-t-elle ? La ligne s'enroule-t-elle correctement sur le tambour ou s'accumule-t-elle d'un côté ? Un amoncellement peut exercer une pression énorme sur le boîtier du treuil et doit être corrigé immédiatement en arrêtant la traction et en ajustant la direction de la ligne.
- Odeur : Un moteur électrique en surchauffe dégage une odeur âcre et distincte. Si vous sentez cette odeur, arrêtez immédiatement la traction. Votre treuil a dépassé son cycle de fonctionnement et a besoin de temps pour refroidir. Si vous continuez à tirer, les enroulements du moteur seront endommagés de façon permanente.
La patience est une vertu en matière de treuillage. Si la traction est longue et lourde, il est conseillé de faire une pause toutes les minutes environ pour laisser refroidir le moteur du treuil et se donner un moment pour réévaluer la situation. Cette approche méthodique et observatrice est ce qui sépare une récupération réussie d'un échec dangereux.
Étape 5 : Procédures post-opératoires
La récupération n'est pas terminée lorsque le véhicule est libéré. Un opérateur discipliné sait que le travail n'est terminé que lorsque tout l'équipement est rangé correctement et en toute sécurité, inspecté et prêt pour la prochaine utilisation. La précipitation de la phase de nettoyage est une erreur courante qui endommage l'équipement et crée des risques de sécurité pour l'avenir. Cet acte final du processus de treuillage témoigne du professionnalisme de l'opérateur et de son respect pour les outils.
Déconnexion et rangement en toute sécurité du matériel de gréement
Une fois le véhicule récupéré sur un sol stable et sécurisé, le processus de démontage du gréement peut commencer.
- Sécuriser le véhicule récupéré : Assurez-vous que le frein de stationnement du véhicule récupéré est serré, qu'il est en position de parking ou de vitesse et, si nécessaire, que ses roues sont calées. Il ne doit pas pouvoir rouler ou se déplacer pendant que vous déconnectez le gréement.
- Introduire Slack : Avec le treuil, tendez juste assez de ligne pour créer du mou dans le système. Quelques centimètres suffisent. Cela permet de relâcher la tension des manilles et des sangles, ce qui facilite leur déconnexion.
- Déconnecter le crochet : En portant des gants, marchez jusqu'au point d'ancrage. Retirez le crochet du treuil de la manille. Utilisez la sangle du crochet et non vos doigts.
- Récupérez votre matériel : Dévissez la goupille de votre manille et retirez-la du protecteur de tronc d'arbre ou de la sangle. Récupérez la sangle. Si vous avez utilisé une poulie, récupérez-la également. Faites une liste de contrôle mentale de chaque pièce d'équipement que vous avez utilisée : un protecteur de tronc, deux manilles, une poulie. Faites le compte physiquement pour vous assurer que rien n'a été oublié. Laisser une manille sur un arbre n'est pas seulement une perte d'équipement coûteux, c'est aussi un danger.
- Nettoyer au fur et à mesure : Avant de ranger votre matériel, procédez à une inspection et à un nettoyage rapides. Si vos sangles et vos manilles sont couvertes de boue, rincez-les à l'eau si possible ou enlevez au moins les gros débris. Le stockage de matériel boueux accélère la corrosion et la dégradation. Un axe de manille boueux peut devenir difficile à manipuler.
Nettoyage et inspection du câble du treuil
Le câble du treuil vient d'être soumis à d'énormes contraintes et à des conditions potentiellement abrasives. Il est temps de procéder à une inspection après l'opération.
- Pour les câbles en acier : Lorsque vous rembobinez la ligne (sous tension, comme décrit précédemment), procédez à une nouvelle inspection. Recherchez tout nouveau dommage qui aurait pu se produire pendant la traction - nouveaux brins cassés, plis ou méplats. Si vous constatez de nouveaux dommages importants, notez-les. Il se peut que le câble doive être raccourci ou remplacé.
- Pour les cordes synthétiques : Ceci est particulièrement important. Les cordes synthétiques doivent être nettoyées. Si elle a été utilisée dans de la boue, du sable ou de l'eau sale, elle est maintenant remplie de particules abrasives qui la détruiront lentement de l'intérieur. Une fois rentré à la maison, le câble doit être déroulé jusqu'au bout et lavé soigneusement avec un détergent doux et de l'eau, puis laissé sécher complètement à l'air avant d'être enroulé à nouveau sur le treuil. Sur le terrain, essayez au moins de le rincer à l'eau claire. Lorsque vous l'enroulez, vérifiez qu'il n'y a pas de nouveaux effilochages, de coupures ou d'abrasions survenus au cours de la traction.
Cette inspection post-opération est votre première chance de détecter les dommages et de planifier les réparations. Elle permet de s'assurer que la prochaine fois que vous aurez besoin de votre treuil, il sera en bon état et prêt à fonctionner. Il s'agit d'un principe fondamental de la propriété responsable et d'un élément clé de la connaissance de l'utilisation d'un treuil électrique tout au long de son cycle de vie.
Fixation du treuil pour le transport
La dernière étape consiste à fixer la ligne et le crochet pour le voyage.
- Enrouler la ligne : Enroulez la ligne jusqu'à ce que l'hameçon soit à un ou deux pieds du chaumard.
- Fixer le crochet : Il existe plusieurs façons de fixer le crochet. Certains pare-chocs de treuil ont une languette dédiée au crochet. Vous pouvez également l'attacher à un anneau en D monté sur votre pare-chocs. L'objectif est d'empêcher le crochet de se balancer librement, ce qui risquerait d'endommager votre pare-chocs ou votre calandre, ou de s'accrocher à un obstacle.
- Pré-tension de la ligne : Une fois le crochet fixé, actionnez le treuil juste assez pour que la ligne soit légèrement tendue. Cela empêche le crochet de s'entrechoquer et garantit que la ligne reste bien enroulée sur le tambour. Ne le serrez pas trop, car cela soumettrait le système à une tension constante et inutile. Il doit être juste serré.
- Couvrir le treuil : Si vous avez une housse de treuil, c'est le moment de la mettre. Une housse protège le treuil et, plus important encore, le câble synthétique des rayons UV et de la saleté de la route. Elle permet également de garder les composants propres et prêts pour le prochain déploiement.
Une fois le matériel rangé, la ligne inspectée et sécurisée, et le treuil recouvert, l'opération est vraiment terminée. Cette conclusion méthodique et ordonnée n'est pas seulement une question de propreté ; elle fait partie intégrante du système de sécurité, garantissant que votre équipement est toujours dans un état connu et fiable.
Étape 6 : Techniques de treuillage avancées pour les scénarios complexes
La maîtrise des principes de base d'une traction en ligne droite constitue la base. La véritable expertise se révèle toutefois dans la capacité à résoudre des problèmes de récupération complexes à l'aide de techniques de gréement avancées. Ces méthodes sont des applications des principes physiques que nous avons abordés, utilisant des outils tels que les poulies et les points d'ancrage multiples pour multiplier la force, changer de direction et surmonter des obstacles apparemment insurmontables. Il ne s'agit pas d'astuces de salon, mais d'outils essentiels pour l'opérateur sérieux qui peut rencontrer des situations où une simple traction est insuffisante ou impossible. L'apprentissage de ces techniques est une étape importante dans la compréhension de l'utilisation d'un treuil électrique.
La traction en double ligne : Doublez votre puissance avec un bloc d'arraché
Il s'agit peut-être de la technique avancée la plus courante et la plus utile. Elle vous permet de presque doubler la capacité de traction de votre treuil, ce qui rend possible la récupération d'une charge beaucoup plus lourde que la capacité nominale d'une seule ligne de votre treuil.
Le scénario : Vous avez un treuil de 8 000 livres, mais la charge calculée pour un véhicule profondément embourbé est de 12 000 livres. Une traction d'une seule ligne surchargerait gravement votre treuil.
La procédure :
- Ancrer un bloc d'arraché : Fixez solidement une poulie au point d'ancrage choisi (par exemple, un arbre avec un protecteur de tronc d'arbre et une manille).
- Faire fonctionner la ligne : Enroulez votre câble de treuil jusqu'à la poulie d'arrêt et passez-le dans la poulie.
- Renvoyer la ligne : Ramenez l'extrémité de la ligne du treuil vers votre propre véhicule.
- Fixez-le à votre véhicule : Fixez solidement le crochet du treuil à un point de récupération nominal sur le châssis de votre propre véhicule de treuillage.
- La physique au travail : Vous avez maintenant créé un système avec deux lignes entre votre véhicule et le point d'ancrage. La charge est répartie sur les deux lignes. Cela a deux effets :
- Puissance : La force de traction exercée sur la charge est presque doublée. Votre treuil de 8 000 livres peut maintenant exercer une force de près de 16 000 livres (le gain n'est pas exactement le double en raison du frottement de la poulie).
- Vitesse : La vitesse du câble est divisée par deux. Votre treuil doit tirer deux fois plus de câble pour déplacer le véhicule sur la même distance. C'est une bonne chose : la traction est plus lente, mieux contrôlée et plus facile pour le moteur du treuil.
La double ligne de traction est votre meilleur ami lorsque vous êtes confronté à une charge très lourde ou lorsque vous souhaitez réduire la pression exercée sur votre treuil pour une récupération plus douce et plus sûre.
La réorientation de la traction : changer l'angle de la traction
Nous l'avons déjà abordée, mais elle mérite un examen plus approfondi. Cette technique est utilisée lorsque le seul ancrage approprié n'est pas dans la direction de traction souhaitée.
Le scénario : Votre véhicule est dans un fossé et vous devez le tirer tout droit sur la route. Cependant, le seul arbre d'ancrage solide est situé à 45 degrés sur le côté.
La procédure :
- Ancre primaire : Fixez une poulie à l'arbre d'ancrage sur le côté, à l'aide d'un protecteur d'arbre et d'une manille.
- Faire fonctionner la ligne : Faites passer la ligne du treuil de votre véhicule à travers le bloc d'arrêt de l'ancrage latéral.
- Point d'ancrage secondaire : Poursuivez la ligne depuis le bloc d'arrêt jusqu'à un point situé directement devant la trajectoire prévue de votre véhicule.
- Fixer le crochet : Fixez le crochet du treuil à ce point avant. Ce point n'a pas besoin d'être aussi solide que l'ancrage principal, puisqu'il sert principalement à établir la direction de la traction, mais il doit tout de même être solide. Dans de nombreux cas, vous pouvez attacher le crochet au pare-chocs ou à un point de récupération sur le véhicule bloqué lui-même, créant ainsi une double ligne de traction qui redirige également la force.
Lorsque vous utilisez le treuil, la ligne essaie de se redresser. Le bloc d'accrochage agit comme un pivot, redirigeant la force de traction de l'ancrage latéral en une traction vers l'avant sur votre véhicule. Cela vous permet de tirer un véhicule hors d'un endroit étroit ou de contourner un obstacle avec précision. Vous pouvez même utiliser plusieurs blocs d'arrêt et ancres pour créer des tractions complexes à angles multiples afin de faire passer un véhicule dans une section de sentier difficile.
Auto-récupération en cas de boue profonde ou de pente raide
Parfois, c'est vous qui êtes coincé et vous devez vous en sortir. Les principes sont les mêmes, mais la perspective est inversée.
Le scénario : Votre véhicule est embourbé jusqu'aux essieux et un arbre solidement ancré se trouve à 15 mètres devant vous.
La procédure :
- Gréement : Enroulez votre ligne de treuil et attachez-la solidement à l'arbre d'ancrage. Si l'on s'attend à ce que la traction soit très forte, c'est le moment idéal pour utiliser une double ligne de traction. Vous attacherez une poulie à l'arbre d'ancrage, vous y passerez votre ligne et vous ramènerez le crochet à un point de récupération sur votre propre véhicule.
- Fonctionnement : Depuis le siège du conducteur (si vous disposez d'une télécommande en cabine) ou en vous plaçant en sécurité sur le côté, commencez à tirer.
- Pilotage et assistance : Lorsque le véhicule commence à se déplacer, vous devez vous asseoir sur le siège du conducteur pour le diriger. Maintenez les roues avant dans la direction où vous voulez aller. Comme pour une récupération assistée, mettez doucement les gaz une fois que le véhicule est en mouvement, en adaptant la vitesse des roues à la vitesse de traction du treuil.
- Patience sur les pentes : Lorsque vous vous hissez en haut d'une colline escarpée, le processus peut être lent. Il est souvent préférable de tirer par petites étapes. Tirez sur 10 à 15 pieds jusqu'à ce que vous atteigniez un endroit plus stable, puis faites une pause. Bloquez le véhicule à l'aide des freins et, si nécessaire, calez les roues. Cela permet au moteur du treuil et à la batterie du véhicule de se reposer. Vous pouvez alors réajuster votre gréement si nécessaire et tirer la section suivante. Cette méthode de "saut de puce" est beaucoup plus sûre et plus durable que de tenter de remonter une pente difficile en une seule fois, de façon longue et ininterrompue.
Ces techniques avancées doivent être pratiquées dans un environnement sûr et contrôlé avant d'être utilisées dans une situation de récupération réelle. Elles font passer l'acte de treuillage d'une simple traction à une forme de résolution de problèmes, permettant à l'opérateur de surmonter une gamme beaucoup plus large de défis. Une compréhension approfondie de ces méthodes est ce qui définit véritablement un expert dans l'utilisation d'un treuil électrique.
Étape 7 : Maintenance et entretien à long terme
Un treuil électrique est un investissement important et, comme toute pièce de machinerie de précision, sa longévité et sa fiabilité dépendent d'un programme cohérent d'entretien et de maintenance. Les environnements difficiles dans lesquels les treuils fonctionnent - boue, eau, poussière et charges extrêmes - font des ravages. Une philosophie d'entretien proactive, qui consiste à anticiper et à prévenir les problèmes plutôt que de simplement réagir, permettra à votre treuil d'être prêt à fonctionner lorsque vous en aurez le plus besoin. La négligence est la cause la plus fréquente de défaillance des treuils.
Création d'un calendrier de maintenance : Une approche proactive
Au lieu d'attendre que quelque chose se casse, établissez un programme d'entretien simple et reproductible en fonction de votre utilisation.
- Après chaque utilisation : Comme indiqué à l'étape 5, nettoyez et inspectez le cordage et le gréement. Il s'agit de votre première ligne de défense.
- Mensuelle (pour les utilisateurs fréquents) ou trimestrielle (pour les utilisateurs occasionnels) :
- Utiliser le treuil : Faites entrer et sortir le treuil pendant une minute environ sans aucune charge. Cela permet de redistribuer la graisse dans la boîte de vitesses et de maintenir les contacts électriques et les brosses du moteur propres.
- Vérifier les connexions électriques : Inspectez les fils de gros calibre qui vont de la batterie au boîtier de commande du treuil et au moteur. Assurez-vous que les connexions sont bien serrées, propres et exemptes de corrosion. Une brosse métallique et de la graisse diélectrique peuvent prévenir les futurs problèmes de corrosion au niveau des bornes.
- Inspecter la monture : Vérifiez à nouveau le serrage des boulons qui fixent le treuil à sa plaque de montage et la plaque au véhicule. Les vibrations peuvent entraîner un desserrement de ces boulons au fil du temps.
- Inspection complète de la ligne : Déroulez toute la ligne du treuil et vérifiez qu'elle n'est pas endommagée d'un bout à l'autre. Il s'agit d'une inspection plus approfondie que le contrôle rapide effectué après chaque utilisation.
- Annuellement : C'est le moment d'offrir un service plus approfondi.
- Service de la boîte de vitesses : En fonction des recommandations du fabricant et de votre niveau de confort mécanique, il peut s'avérer nécessaire d'ouvrir la boîte de vitesses pour inspecter les engrenages et remplacer la graisse. La graisse usagée peut être contaminée par de l'eau ou des saletés et perdre ses propriétés lubrifiantes.
- Service des moteurs : Vérifiez que le moteur ne présente pas de signes d'infiltration d'eau. Si vous traversez souvent des cours d'eau, cette vérification est particulièrement importante. Certains moteurs sont équipés de bouchons de vidange qui permettent d'évacuer l'humidité accumulée.
- Boîtier de commande (ensemble de solénoïdes) : Ouvrez le boîtier de commande et inspectez les solénoïdes ou le contacteur. Recherchez des traces de corrosion, des fils desserrés ou des signes d'arc électrique (marques noires de brûlure).
Ce programme peut sembler rigoureux, mais il représente beaucoup moins de travail que de s'occuper d'un treuil en panne dans un endroit éloigné au cours d'une récupération critique.
Lubrification, connexions électriques et vérifications mécaniques
Lubrification : La principale zone nécessitant une lubrification est la boîte d'engrenages. N'utilisez que le type de graisse recommandé par le fabricant du treuil. L'utilisation d'un mauvais type de graisse peut entraîner des problèmes par temps froid ou ne pas protéger les engrenages sous haute pression. Le câble d'acier doit également être lubrifié. Un lubrifiant spécialisé pour câbles métalliques pénètre dans les torons pour les lubrifier à l'intérieur et les recouvrir d'une couche protectrice contre la corrosion. Les câbles synthétiques ne nécessitent pas de lubrification.
Système électrique : Le système électrique est la ligne de vie du treuil. Le moteur du treuil tire une énorme quantité de courant (jusqu'à 400 ampères) sous charge, bien plus que tout autre accessoire sur votre véhicule. Les connexions doivent donc être parfaites. Toute corrosion ou relâchement crée une résistance, ce qui génère de la chaleur, réduit la puissance et peut entraîner une défaillance des composants ou un incendie. Nettoyer régulièrement les bornes de la batterie et les connexions du treuil est une tâche simple mais vitale. Veillez à ce que les câbles soient acheminés loin des arêtes vives ou des composants chauds du système d'échappement afin d'éviter les frottements et les courts-circuits.
Contrôles mécaniques : La sensation et le son de votre treuil peuvent vous en dire long. Le levier d'embrayage s'engage-t-il et se désengage-t-il en douceur ? S'il est rigide, le mécanisme a peut-être besoin d'être nettoyé et lubrifié. Lorsque le treuil fonctionne, y a-t-il des bruits de grincement ou de cliquetis ? Ces bruits indiquent que l'engrenage est endommagé ou qu'il y a des débris à l'intérieur du boîtier. Un treuil en bonne santé fonctionne avec un ronronnement doux et puissant.
Quand remplacer votre câble de treuil ou faire appel à un professionnel ?
Même avec les meilleurs soins, les composants s'usent. Savoir quand retirer une pièce est un jugement de sécurité essentiel.
- Remplacement d'un câble d'acier : Un câble d'acier doit être remplacé s'il présente un pli visible, s'il a été écrasé ou présente des méplats, ou s'il présente une forte concentration de fils cassés dans une zone (par exemple, plus de 6 fils cassés dans une seule nappe de câble).
- Remplacement d'une corde synthétique : La durée de vie d'un câble synthétique est déterminée par l'abrasion et l'exposition aux UV. Elle doit être remplacée si elle présente un effilochage important (apparence "floue" sur de grandes sections), des coupures ou des entailles affectant plus de 25% de son diamètre, ou des signes de "glaçage" ou de fonte sous l'effet de la chaleur. Si la corde a été soumise à des chocs (par exemple, si elle a été utilisée pour une récupération dynamique), sa structure interne peut être compromise et elle doit être remplacée même si elle semble en bon état.
- Recherche d'un service professionnel : Si votre treuil émet des bruits inhabituels, si le frein ne retient pas la charge en toute sécurité ou si vous l'avez immergé pendant une période prolongée, il est judicieux de le faire réviser par un technicien qualifié. Il pourra démonter, inspecter et sceller correctement l'appareil, afin de s'assurer que ses composants internes sont en bon état. Si de nombreuses tâches d'entretien peuvent être effectuées par le propriétaire, il est souvent préférable de confier une révision complète à des experts.
Cet engagement à l'égard de l'entretien à long terme complète le cercle des propriétaires de treuils responsables. Il garantit que les connaissances relatives à l'utilisation d'un treuil électrique s'appuient sur un outil qui est toujours dans un état de préparation et de sécurité maximum.
Le contexte plus large des équipements de levage et de traction
Le treuil électrique, malgré toute sa puissance et son utilité, n'est qu'un instrument parmi d'autres dans le vaste orchestre des équipements de manutention. Pour acquérir une véritable maîtrise dans ce domaine, il faut comprendre non seulement le treuil, mais aussi ses proches : les palans, les pinces et les élingues qui accomplissent des tâches connexes mais distinctes. Situer le treuil électrique dans ce contexte plus large permet une appréciation plus nuancée de ses forces et de ses limites spécifiques, ce qui garantit que le bon outil est toujours sélectionné pour le travail à effectuer. C'est l'essence même de la compétence professionnelle : savoir non seulement comment utiliser un outil, mais aussi quand et, surtout, quand ne pas l'utiliser.
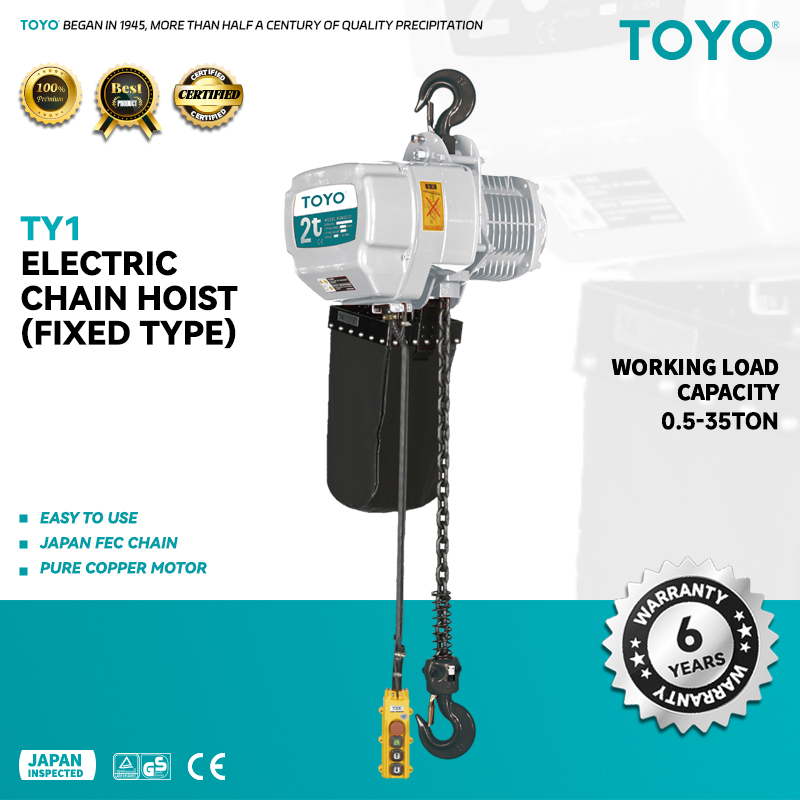
Comparaison entre les treuils électriques et les palans électriques à chaîne pour les ascenseurs verticaux
La distinction entre un treuil et un palan est souvent source de confusion. Bien qu'ils puissent tous deux déplacer des objets lourds, leur conception et leurs applications sont fondamentalement différentes. Comme nous l'avons établi, un treuil de récupération de véhicules est un dispositif de traction. Un treuil de récupération de véhicule est un dispositif de traction. palan électrique à chaîne est un appareil de levage. Cette distinction n'est pas arbitraire ; elle est ancrée dans leurs caractéristiques techniques et de sécurité.
Un palan électrique à chaîne, comme ceux que l'on trouve dans les ateliers et les usines, est conçu pour un véritable levage vertical, au-dessus de la tête. Son système de freinage est généralement plus robuste et est conçu pour suspendre une charge indéfiniment sans fluage. Sa chaîne de levage est fabriquée en acier allié trempé de haute qualité, spécialement conçu pour le levage (Prolift, 2025). L'ensemble de l'unité est évalué selon des normes de levage strictes qui tiennent compte de facteurs tels que les charges dynamiques et les facteurs de sécurité propres aux objets suspendus (Zoho Hoist, 2025).
Tenter d'utiliser un treuil de véhicule standard pour un levage vertical est une mauvaise application dangereuse de l'outil. Le frein du treuil est principalement conçu pour maintenir une charge sur une pente, et non pour la suspendre au-dessus de la tête, où une défaillance pourrait être catastrophique. La stratification du câble sur le tambour d'un treuil signifie également que sa capacité de traction (ou de levage) varie au fur et à mesure que le câble s'enroule, une variable inacceptable pour des opérations de levage précises. Pour toute tâche consistant à soulever une charge du sol et à la suspendre, comme le levage d'un moteur, d'une machine ou de matériaux de construction, un palan électrique à chaîne est le seul et unique choix sûr. De même, pour le levage manuel, un palan manuel à chaîne fournit les caractéristiques de contrôle et de sécurité nécessaires à la tâche.
L'utilité des pinces de levage dans la manutention des matériaux
Lors du levage ou de la traction, la connexion à l'objet lui-même est aussi importante que le dispositif qui fournit la force. Si un véhicule possède des points de récupération nominaux, ce n'est pas le cas de nombreux autres objets. C'est là que des pinces de levage deviennent indispensables. Les pinces de levage sont des dispositifs mécaniques conçus pour saisir solidement des matériaux tels que des plaques d'acier, des poutres ou des tuyaux, offrant ainsi un point de levage sûr.
Il existe différents types de pinces de levage, chacun ayant une fonction spécifique :
- Colliers de serrage : Elles utilisent un mécanisme de mâchoires qui se resserrent au fur et à mesure que la charge augmente. Ils sont utilisés pour soulever des plaques d'acier à la verticale ou à l'horizontale.
- Pinces à poutre : Ils se fixent à l'aile d'une poutre en I, fournissant un point d'ancrage sûr et temporaire auquel suspendre un palan.
- Colliers de serrage : Ils sont conçus pour saisir la surface incurvée d'un tuyau afin de le soulever ou de le tirer.
Dans un environnement industriel ou de construction, l'utilisation combinée d'un palan électrique à chaîne et d'une pince de levage appropriée est la procédure standard pour déplacer des matériaux lourds en toute sécurité. On ne se contente pas d'enrouler une élingue autour d'une plaque d'acier lisse en espérant que tout ira bien ; le risque de glissement de la charge est trop grand. Les pinces de levage assurent une connexion positive et technique.
Cela met en évidence un principe universel qui s'applique également au treuillage : l'intégrité de l'ensemble du système est aussi forte que son maillon le plus faible. Dans une opération de treuillage, votre "maillon faible" peut être un mauvais ancrage, une corde effilochée ou un crochet mal fixé. Dans une opération de levage, il peut s'agir d'une pince de levage mal utilisée ou d'un palan dont la capacité n'est pas adaptée à la charge. Une compréhension globale de la manutention nécessite une appréciation de tous ces éléments, de l'ancre à l'appareil de levage, en passant par la pince de levage ou le palan. palans à levier utilisé pour une tension précise sur le élingues à haute résistance qui relient tous les éléments entre eux. L'opérateur professionnel sait comment utiliser un treuil électrique, mais il sait aussi qu'il fait partie d'un écosystème d'outils plus large, et il a la sagesse de choisir le bon pour chaque tâche.
Foire aux questions (FAQ)
Qu'est-ce que le "cycle d'utilisation" d'un treuil électrique et quelle est son importance ? Le cycle de travail correspond à la durée pendant laquelle un treuil peut fonctionner en charge avant de devoir refroidir. Il est exprimé sous la forme d'un rapport entre le temps de fonctionnement et le temps d'arrêt. Par exemple, un treuil peut avoir un cycle de travail de 5% à pleine charge, ce qui signifie que pour chaque minute de traction, il a besoin de 19 minutes de repos. Le dépassement du cycle d'utilisation entraîne une surchauffe du moteur électrique, ce qui peut provoquer des dommages permanents. Il s'agit d'un aspect crucial de l'utilisation correcte d'un treuil électrique, en particulier lors de tractions longues et lourdes. Vérifiez toujours les spécifications du fabricant en ce qui concerne le cycle d'utilisation.
Puis-je utiliser mon treuil pour soulever quelque chose en hauteur ? Non, vous ne devez pas utiliser un treuil de récupération de véhicule standard pour le levage vertical. Ces treuils sont conçus comme des dispositifs de traction. Leurs systèmes de freinage et leurs mécanismes d'enroulement du câble ne sont pas conçus pour répondre aux exigences de sécurité liées à la suspension d'une charge au-dessus de la tête. Pour le levage vertical, vous devez utiliser un appareil spécialement conçu à cet effet, tel qu'un palan manuel à chaîne ou un palan électrique à chaîne.
Quelle puissance un treuil électrique tire-t-il de la batterie de ma voiture ? Un treuil électrique consomme une très grande quantité de courant électrique, souvent plus de 400 ampères à pleine charge. C'est pourquoi vous devez toujours laisser tourner le moteur de votre véhicule pendant une opération de treuillage. Le moteur fait tourner l'alternateur, qui reconstitue la charge de la batterie. Sans le moteur en marche, une forte traction peut vider une batterie de voiture standard en quelques minutes seulement, vous laissant avec une batterie à plat et une récupération inachevée.
Quelle est la différence entre un chaumard à rouleaux et un chaumard Hawse ? Un chaumard guide le câble du treuil sur le tambour. Un chaumard à rouleaux utilise quatre rouleaux en acier et est conçu exclusivement pour être utilisé avec un câble en acier. Un chaumard Hawse est une pièce d'aluminium lisse et arrondie, conçue exclusivement pour être utilisée avec un câble de treuil synthétique. L'utilisation d'un câble en acier sur un chaumard Hawse va rapidement ronger et abîmer l'aluminium, et l'utilisation d'un câble synthétique sur un chaumard à rouleaux peut entraîner le pincement et l'effilochage du câble dans les coins des rouleaux. Il est essentiel d'utiliser le bon chaumard pour votre type de ligne.
Pourquoi dois-je placer une couverture ou un amortisseur sur la ligne du treuil ? Placer un amortisseur de ligne (une couverture lourde, un amortisseur en vinyle lesté ou même un manteau lourd) au point médian d'une ligne de treuil tendue est une procédure de sécurité essentielle, en particulier pour les câbles en acier. La rupture de la ligne libère une énorme quantité d'énergie stockée. Le poids de l'amortisseur permet d'absorber cette énergie et de forcer les extrémités cassées à tomber au sol au lieu d'être projetées dans les airs, ce qui peut être mortel. Bien que les cordes synthétiques emmagasinent moins d'énergie, l'utilisation d'un amortisseur reste une pratique recommandée.
Comment savoir de quelle taille de treuil j'ai besoin pour mon véhicule ? Une ligne directrice commune et fiable consiste à choisir un treuil dont la capacité de traction nominale est au moins égale à 1,5 fois le poids brut du véhicule (PBV). Par exemple, si votre camion pèse 6 000 livres, vous devriez rechercher un treuil ayant une capacité d'au moins 9 000 livres (6 000 x 1,5 = 9 000). Cette capacité offre une marge de sécurité cruciale pour tenir compte de la résistance accrue de la boue, des pentes et d'autres facteurs environnementaux que vous rencontrerez lors d'une véritable récupération.
Le câble synthétique est-il vraiment meilleur que le câble en acier ? La notion de "mieux" dépend de la priorité. Pour la plupart des activités de loisirs et de récupération de véhicules, le câble synthétique est considéré comme supérieur en raison de ses avantages significatifs en matière de sécurité (il n'emmagasine pas autant d'énergie et est moins dangereux en cas de rupture) et de sa légèreté, qui le rend beaucoup plus facile à manipuler. Cependant, le câble en acier est plus résistant à l'abrasion et est souvent préféré dans les environnements industriels très abrasifs ou rocheux. Le choix dépend d'un compromis entre la sécurité et la manipulation du synthétique et la durabilité brute de l'acier.
Une dernière réflexion sur la responsabilité et la maîtrise
Apprendre à utiliser un treuil électrique, c'est conclure un pacte de responsabilité. C'est accepter de manier un outil capable de générer une force immense, une force qui peut être constructive et libératrice, ou destructrice et dangereuse. La maîtrise ne se trouve pas dans la vitesse de traction ou la taille du treuil. Elle se trouve dans les moments calmes de la préparation : l'inspection diligente, l'évaluation réfléchie du terrain, le choix minutieux d'une ancre et la construction précise du gréement. Elle se trouve dans la patience d'une traction lente et contrôlée et dans la discipline d'un nettoyage minutieux après l'opération.
Ce processus est un exercice d'éthique pratique. Il requiert de l'empathie pour l'environnement dans lequel vous vous trouvez, ce qui vous amène à protéger les arbres que vous utilisez comme ancres. Il exige un sens du devoir pour votre sécurité et celle des autres, vous obligeant à dégager la zone et à utiliser les signaux appropriés. Il exige un profond respect pour l'équipement lui-même, ce qui vous incite à l'entretenir avec soin. En fin de compte, le treuil électrique est un puissant amplificateur, non seulement de la force, mais aussi du caractère de l'opérateur. Entre les mains d'un individu pressé, ignorant ou négligent, il constitue un danger. Dans les mains d'un opérateur averti, méthodique et responsable, c'est une clé qui peut ouvrir la voie dans les situations les plus difficiles. Le passage du novice à l'expert est un parcours où l'on cultive non seulement la compétence, mais aussi la sagesse.
Références
Jindiao Lifting. (2025, 11 octobre). Liste de contrôle en 7 points de l'expert : Selecting the right high load capacity hoist in 2025 (Sélection du bon palan à grande capacité de charge en 2025). Récupéré de https://www.jindiaolifting.com/expert-7-point-checklist-selecting-the-right-high-load-capacity-hoist-in-2025/
Prolift. (2025, 29 octobre). Tout sur les chaînes de levage : Types, grades, applications. Récupéré de
Industrie Toyo. (2025, 25 septembre). Guide de l'acheteur : 7 facteurs critiques pour choisir un palan à chaîne de 3/4 de tonne en 2025. Récupéré de https://www.toyo-industry.com/buyers-guide-7-critical-factors-for-choosing-a-3-4-ton-chain-hoist-in-2025/
Ulide Hoist (2025, 25 septembre). Guide pratique des capacités de charge des palans à chaîne : 5 erreurs critiques à éviter en 2025. Récupéré de https://www.ulidehoist.com/a-practical-chain-hoist-load-capacity-guide-5-critical-mistakes-to-avoid-in-2025/
Weihua. (2025, 24 juin). Weihua chain hoist user manual. Récupéré de https://www.weihualargecrane.com/blog/weihua-chain-hoist-user-manual/
Zoho Hoist (2025, 28 août). Le guide en 5 étapes pour maîtriser la charge de travail en chaîne (SWL) en 2025. Récupéré de https://www.zohohoist.com/the-5-step-guide-to-mastering-chain-safe-working-load-swl-in-2025/
Zoho Hoist (2025, 28 août). The ultimate 2025 guide to chain working load & lifting safety. Récupéré de